Setting up a Netgear router is an essential step in optimizing your home or office internet connection. Whether you are a beginner or someone familiar with networking, following a structured setup process ensures a stable and secure network. Many users encounter difficulties when installing their routers due to incorrect configurations or improper placement. If you're wondering how to install Netgear router, this guide provides a step-by-step breakdown of the installation process, covering everything from checking compatibility to finalizing network settings. By carefully following each stage, you can avoid common issues and ensure your router is working efficiently. With proper placement, secure connections, and updated firmware, your Netgear router will deliver a seamless internet experience, improving connectivity for streaming, gaming, and daily online activities.

What to Do Before Installing Your Netgear Router
Check Router Compatibility and Requirements
Before setting up your Netgear router, it’s important to ensure that it meets your Internet Service Provider (ISP) requirements and is compatible with your current modem. Some ISPs maintain a list of approved routers, so it’s worth checking their website or contacting customer support before installation. Additionally, review the router’s specifications to verify that it supports the internet speeds you are paying for. A mismatch between router capabilities and ISP bandwidth can lead to performance issues. Furthermore, ensure that your internet plan supports the router’s technology, such as dual-band or tri-band functionality. Checking these details in advance can prevent potential connectivity issues and help you get the most out of your new router. Proper compatibility verification is crucial for achieving an optimal network setup that meets your household or office demands.
Gather Necessary Equipment
To ensure a smooth setup process, gather all the necessary equipment before starting the installation. You will need your Netgear router, a modem, an Ethernet cable, a power adapter, and a computer or mobile device to access the router’s setup interface. If you are setting up a wireless network, ensure that your computer or smartphone can connect via Wi-Fi. Additionally, check that your modem is in working condition. If it’s outdated or malfunctioning, you may experience connectivity issues even with a properly installed router. Some users also prefer having a spare Ethernet cable on hand in case of connection issues. Preparing all these items beforehand will make the installation more efficient, eliminating delays caused by missing components or last-minute troubleshooting. A well-prepared setup process guarantees a faster and smoother installation of your Netgear router.
Choose the Right Placement for Your Router
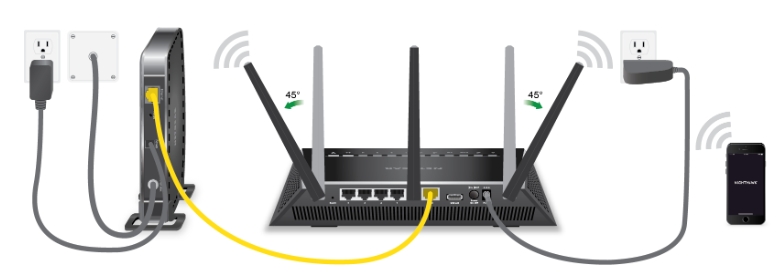
The location of your router has a significant impact on network performance. To ensure a strong and consistent Wi-Fi signal, place the router in a centralized and elevated position within your home or office. Avoid placing it near walls, large furniture, or electronic devices that could obstruct or interfere with the signal. Devices like microwaves, cordless phones, and baby monitors can cause wireless interference, reducing internet speeds and connectivity. Additionally, keep the router as close as possible to the modem to ensure a reliable connection. If you are setting up a dual-band router, position the antennas to maximize coverage—typically one antenna pointing vertically and another horizontally. Proper router placement enhances Wi-Fi coverage, reduces dead zones, and ensures that all connected devices receive a stable internet connection.
Step-by-Step Guide to Install Netgear Router
Step 1: Connect the Router to the Modem
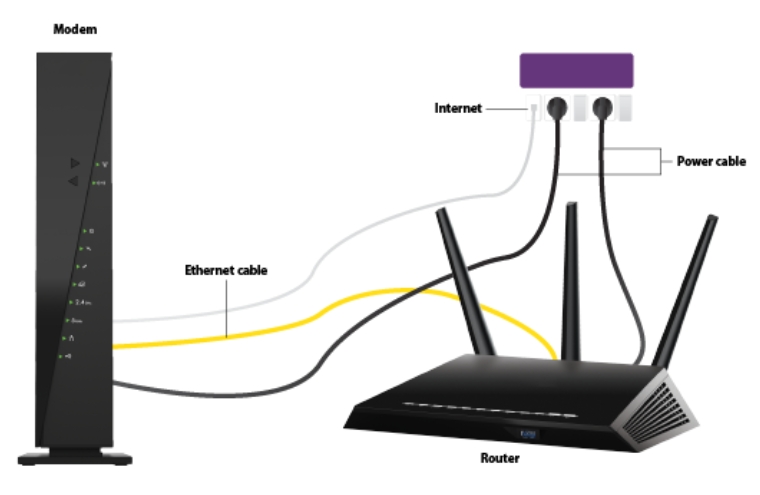
The first step in setting up your Netgear router is to connect it to your modem using an Ethernet cable. Begin by turning off both the modem and the router before making connections. Plug one end of the Ethernet cable into the modem’s LAN port and the other into the router’s WAN (Internet) port. Once securely connected, power on the modem first and wait for it to fully initialize. This process usually takes a few minutes, with indicator lights stabilizing to show a successful connection. After that, turn on the router and wait for its status lights to indicate readiness. Ensuring a proper connection between the modem and router is essential for a stable internet connection, and skipping this step can lead to unnecessary troubleshooting later in the installation process.

Step 2: Power On and Check Router Lights
After connecting the router to the modem, plug the router into a power source and press the power button if required. Allow the router a few minutes to boot up fully. During this process, indicator lights on the router will begin to flash before stabilizing. A steady green or blue light usually indicates successful connectivity, while a blinking red or amber light may signal issues that require attention. If any lights remain off, check power connections, the modem’s status, and the Ethernet cable between the devices. Different Netgear models have varying light indicators, so refer to the router’s manual if necessary. A properly powered router with stable lights confirms that it is ready for the next installation steps, ensuring a seamless transition to configuring your network settings.
Step 3: Access Netgear Router Setup Page
To configure your Netgear router, you need to access its setup interface. Connect a computer or mobile device to the router using either Wi-Fi or an Ethernet cable. Open a web browser and enter “http://www.routerlogin.net” or the router’s default IP address (192.168.1.1 or 192.168.0.1). You will be prompted to log in using the default username and password, usually “admin” and “password,” unless previously changed. Once logged in, the Netgear setup wizard will guide you through the initial configuration process. This interface allows you to modify network settings, security configurations, and firmware updates. If you are unable to access the setup page, clear your browser’s cache or try a different browser. Successfully logging into the router’s admin panel is a crucial step for configuring and customizing your network.
Step 4: Configure Network Settings
After accessing the router’s setup interface, proceed with configuring network settings to personalize and secure your connection. Assign a unique Wi-Fi network name (SSID) and set a strong password for network security. Choose the WPA2 or WPA3 security protocol to protect against unauthorized access. Additionally, you can configure guest networks, adjust parental controls, or prioritize devices for better connectivity. Some Netgear models also provide Smart Connect features that optimize network performance based on connected devices. If your router supports dual-band functionality, consider assigning separate names for the 2.4GHz and 5GHz bands for better control over connected devices. Completing this step ensures maximum network security and efficiency, allowing all your devices to connect seamlessly.
Step 5: Secure Your Network and Finalize Setup
Securing your Netgear router is essential for protecting your network from unauthorized access. Start by updating the router’s firmware through the Netgear setup page to ensure the latest security enhancements and performance improvements. Enable firewall settings to block potential threats and disable remote management unless needed. Consider setting up MAC address filtering to restrict access to only approved devices. Once all settings are applied, restart the router to finalize the installation. If everything is working correctly, your Netgear router is now fully configured and secure. A properly secured network not only improves performance but also protects personal data from cyber threats.
Conclusion
Installing a Netgear router is a straightforward process when done systematically. If you need guidance on how to install Netgear router, ensuring compatibility, gathering the necessary equipment, and properly configuring network settings will help establish a stable and secure connection. Checking router placement and securing the network with strong passwords and security protocols ensures a smooth Wi-Fi experience. If any issues arise, troubleshooting basic connectivity problems and referring to the router’s manual can provide quick solutions. A properly installed Netgear router enhances internet performance, enabling better gaming, streaming, and remote work connectivity. Following these step-by-step instructions guarantees a hassle-free installation process, ensuring optimal network performance for all your internet needs.
FAQ
How long does it take to install a Netgear router?
Installing a Netgear router typically takes about 20-30 minutes, depending on your familiarity with the equipment and setup process. Preparation and following this guide can streamline the installation, making it quicker and more efficient.
Can I set up my Netgear router without a computer?
Yes, you can set up your Netgear router using a mobile device such as a smartphone or tablet. Simply connect to the router’s Wi-Fi network and access the setup page through a web browser or the Nighthawk app, available for both iOS and Android.
What should I do if I can’t access the Netgear setup page?
If you can’t access the setup page, ensure that your device is correctly connected to the router. Try using a different browser or clearing your browser’s cache. In some cases, rebooting your router or performing a factory reset can resolve the issue. Consult the user manual for detailed troubleshooting steps.